It is very easy to add a free SSL certificate to your GoDaddy shared hosting account, just follow these steps:
- Switch ON your SSH
- Connect SSH from your system
- Install acme.sh script to issue your certificate
- Deploy certificate automatically or manually
Switch ON your SSH
So first step is to switch on SSH on your account,
Step 1: Log in to your account and then go to your products page.
Step 2: Then go to Web Hosting and click manage.
Step 3: On the right side, there is a Setting area select Server tab.
Step 4: In Server Tab at the bottom, you will see SSH access written click the Manage link next to it. 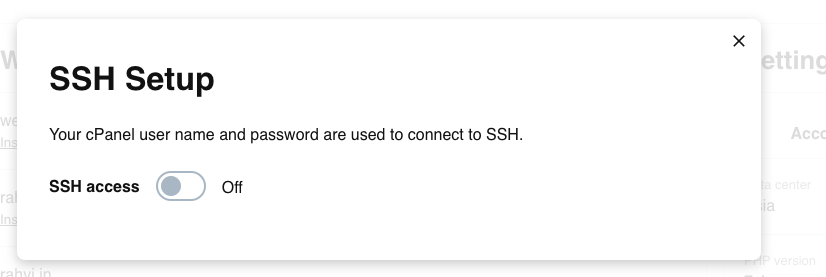 Step 5: Click the button to switch it on. That’s it.
Connect SSH from your system
Now it depends on your OS, how will you connect with SSH. If you are using Windows download PUTTY and if you are on MAC you can connect using a built-in Terminal.
For this tutorial, I am using Mac for windows you can easily find tutorials on how to connect SSH using Putty online.
Step 1: Open Terminal
Step 2: Run this command
ssh {cpanel-username}@yourDomainName.com
Step 3: Use your cpanel password
Switch ON your SSH
Once connected, now we will Install acme.sh script to issue your certificate. Run these commands in the terminal to install acme.sh:
curl https://get.acme.sh | sh -s [email protected]
OR
wget -O - https://get.acme.sh | sh -s [email protected]
Install acme.sh script to issue your certificate
acme.sh --issue -d domain.com -d www.dmoain.com -d mail.modain.com -w /home/[username]/public_html/
Replace [username] with your Cpanel user id. Also if you have sub-domains hosted inside the subfolder then add your folder name after /public_html/[subfolder name]
Deploy certificate automatically or manually
In the last step you have issued a certificate but that is not all you still need to perform one more step. You need to deploy the certificate. You can do this either automatically or manually from the cpanel SSL/TLS section.
Automatically
acme.sh --deploy -d domain.com -d www.domain.com -d mail.domain.com --deploy-hook cpanel_uapi
Manually
Step 1: On CPANEL page search SSL/TLS, open it.
Step 2: On the right side you will see this INSTALL AND MANAGE SSL FOR YOUR SITE (HTTPS) click the link below this title (Manage SSL Sites).
Step 3: Scroll down you will see Install an SSL Website section
Step 4: From the drop-down select your web domain name
Step 5: Now you need to find CRT, Private Key and CABUNDLE
Step 6: Add CRT, Private Key and CABUNDLE and click Install Certificate button
That’s it!
Refresh and check you will see your certificate updated on your site. You can see a lock icon in the address bar which was red and now green.
You must be having a question about where to find CRT, Private Key and CABUNDLE.
So when you generated your certificate these files got generated in the filesystem.
So from cpanel search and goto File Manager, on the left side you will see .acme.sh folder.
Inside this folder, you will see your domain name folder all these files are present inside it just open and copy the text.
Leave comments if you have any questions I will try my best to answer.
Thanks for Reading!